Friday, December 31, 2010

One last post of 2010

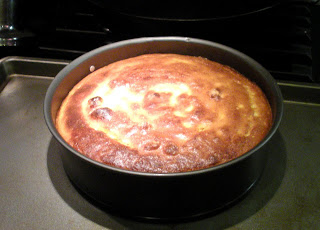
As 2010 draws to a close, I can't help but notice that it's been a pretty good year. Sure, no one cured cancer, or global warming but overall, I feel good about life in general. I also cooked some awesome things this year, one of which was a goat cheese cheesecake for my friend Becky who is deathly allergic to cow's milk.


I think my friends could tell you that I am very accommodating to people's food allergies. It makes me feel like I'm in my own version of Iron Chef: Allergy edition (people could also tell you that I am not so accommodating to picky eaters. If you're not eating something for no reason, I have no patience for that and you can't come to my house for dinner). So when Meredith made this cheesecake a few months back, I thought immediately, oooh, I can make this for Becky.

My one thought about this recipe is that it had the consistency of a souffle rather than a cheesecake. But Meredith told me it's because I forgot to chill it for four hours first. Whoops.

Goat Cheese Cheesecake - adapted from here

Butter and granulated sugar for the cake pan (or oil if butter makes you break out in hives)
Graham Cracker Crumbs and a light tasting oil - for a crust
11 ounces fresh goat cheese, at room temperature
3/4 cup granulated sugar
1 teaspoon vanilla extract
Grated zest of 1 lemon
1 teaspoon freshly squeezed lemon juice
6 large eggs, separated
3 tablespoons all-purpose flour
1/2 pint blackberries (about 1 cup) (I skipped these)
1 pint raspberries (about 2 cups)

Preheat the oven to 350 degrees F. Press some graham cracker crumbs into the bottom of a 9 inch springform pan. Drizzle olive oil on top and bake for about 10 minutes. Let cool.


Put the goat cheese, sugar, vanilla, lemon zest, and lemon juice in the bowl of a stand mixer fitted with the paddle attachment and beat until smooth.


Mmmmm, cheese.

Stir in the egg yolks two at a time, mixing well after each addition. Mix in the flour until incorporated. If you're at your mom's house and don't have access to a stand mixer, use a hand mixer instead. It'll be fine.


Put the egg whites in another mixer bowl, fit the mixer with the whip attachment, and whip on medium speed until soft peaks form.


Using a spatula, gently fold the egg whites into the goat cheese mixture. I used to be totally afraid of folding egg whites. Now I have confidence and these egg whites folded appropriately. Woo!


Spread the batter into the prepared pan.

Bake until a skewer inserted into the center comes out clean, 25 to 30 minutes. Let cool to room temperature.


To serve, run a knife around the inside edge of the pan to loosen the cake, invert a platter on top of the pan, and then invert the plate and pan together. Lift off the pan (or, you know, just take the springy part off the springform pan).


Top with the berries and serve. Chill to get the consistency all creamy like a cheesecake. If you don't, it's still good.


It's a great option for those who can't have milk! Happy super belated birthday, Becky and have a happy new year everybody! See you in 2011.

Tuesday, December 21, 2010

People really like these

Last night, I stumbled across a great idea. Want to see a picture of it?


That, my friends, is an individually sized candied bacon cheesecake with a gingersnap crust and chocolate drizzled on top. Madness, you say? Maybe.

My friends Anna and Alan come over for a Post-Thanksgiving/Pre-Christmas dinner every year where I get to make all the holiday dishes that I don't make for my family. It's really awesome. I was going over my menu ideas with Alan this weekend and I mentioned that I'd make some candied bacon last week but that it was too sticky to sell or give out. "Why don't you put it in a cheesecake?" Alan suggested. Brilliant. So I did.

First, I made a crust out of Trader Joe's Triple Ginger Snaps, by putting them in a ziploc bag and whacking them with a hammer. Then I melted butter and added it to the crumbs. I pushed it into four individual springform pans (Thanks, Chris!!!!!) and baked them for about ten minutes. Then I let them cool.

Then I mixed a package of cream cheese, an egg, 1/4 cup sugar, and a teaspoon of vanilla in my stand mixer. I chopped up my candied bacon (which had been drizzled with chocolate) and threw it in. I baked it until it was firm and chilled it. Then I put melted some chocolate and used a spoon to make pretty lines of chocolate.

The responses I got to this dish (which I admit, I was a little nervous about) were fantastic. Everybody loved it! I only wish I'd taken more pictures. If I'd known it would turn out so well, I would have taken more. Next time!

Sunday, December 12, 2010

Sweet baby Jesus, this cake is good...

...or so said the first person who tasted it. At least, that's what the good people at Vesta Vino (my favorite restaurant in Astoria) told me and why should I not believe them?

I am totally obsessed with this cake. Sometimes I order it when I'm already full and then I feel sick, but it's so good I don't care. It's also so easy to make. This would be a great and appropriate Christmas cake - but Jews like it too! I can say that with confidence. It went over very well at my house this year.

This cake is unbelievably sticky and moist. If you think you don't like dates, you'll still like this cake.


Baby Jesus Cake
6 servings

1 cup dried dates, rehydrated in 1 cup water
1 teaspoon baking soda
3 tablespoons softened butter
¾ cup sugar
2 eggs
1 teaspoon vanilla
1 teaspoon baking powder
1½ cup flour

Preheat the oven to 350 degrees. Butter a 9" square baking dish.

Rehydrate the dates in hot water. Add baking soda and puree in food processor.

In another bowl, cream the butter and sugar. Add the eggs and mix well. Add the vanilla and baking powder. Mix in the date puree, then flour. Pour into baking dish. Bake for 45 minutes or until toothpick inserted is free of cake.

Pour hot sauce (recipe below) over cake and serve with vanilla gelato and unsweetened whipped cream.


Baby Jesus Sauce
1/2 cup light brown sugar
1/2 cup heavy cream
2 tablespoons butter

Melt together until emulsified.


This is not emulsified yet. But it was a hectic picture taking time.

I mean, seriously, how easy was that? Now it's just amazing sticky goodness.

Monday, December 6, 2010

Everybody loves soup

Today, there are little snow flurries outside my window. It makes me feel like eating warm soup and sitting on the couch with a snuggie. That's not quite in the cards for me, but at least I can share this soup recipe with you. My family has made it for the past few years as a first course on Thanksgiving. My dad likes it, even though it has cream, cheese and butter in it (small amounts of each, don't worry).

Butternut Squash Soup adapted from Pie in the Sky

I double this recipe for Thanksgiving and other large occasions.

1 2-lb. butternut squash
1 t. olive oil
1 t. sea salt
fresh-cracked black pepper, to taste

1 large shallot, coarsely diced
2 T. plus 1 t. salted butter
1 t. chopped fresh sage leaves, plus 5-10 fresh sage leaves for garnish
1½+ cups chicken stock (or vegetable stock, if you're cooking for my parents. Safeway Select Organics is a good one and so is Kitchen Basics. Under pain of death, do not use Trader Joe's brand. I love Trader Joe's, but their vegetable stock tastes like feet)
1/2+ c. heavy cream
1/4 cup fresh-grated Parmesan cheese
1/4 t. freshly grated nutmeg
Salt and pepper, to taste

Cut squash in half and scoop out seeds. light oil cut sides of squash; sprinkle with salt and place cut-side-down on baking sheet. Bake at 370 degrees for 40-50 minutes, or until squash is very tender when pierced with a fork. Cool slightly; scoop out pulp, discarding the skin.


Mmmmm, orange squashy goodness. I could eat it now, but then there wouldn't be any soup.

Melt 1 tablespoon of butter in a small sauté pan over medium heat. When butter begins to froth, add shallots; cook three minutes; add chopped sage. sauté for 2 more minutes, or until onions are tender and translucent.


There are few things in the world better than shallots and butter.

Melt additional butter in pan; add 1 cup stock and bring just to simmer. Remove onion mixture from heat and stir into squash pulp; puree in food processor in batches, adding more broth as necessary.

Pour pureed mixture into medium saucepan. Over low heat, stir in heavy cream, nutmeg, parmesan, and salt and pepper to taste (be sure to salt after adding cheese, which is salty itself!). Remove from heat.

I rarely do this next step because I get hungry/lazy. But you feel free! Melt remaining teaspoon salted butter in small sauté pan over medium heat; lay whole sage leaves in butter and fry until frizzled and slightly brown. transfer to paper towel to drain; garnish soup with crispy sage leaves. (Hint: frizzle ribbons of prosciutto with the sage for a special garnish!)


I could eat a lot of this soup. I like to keep it in a jar in my fridge and eat it when I'm too lazy to cook.

Tuesday, November 30, 2010

I refuse to acknowledge Christmas yet

I am still firmly in the fall. It is still November and therefore, not time for Christmas yet. That being said, these pumpkin cinnamon rolls would be an amazing breakfast on Christmas morning. They were a great Thanksgiving morning treat in my house this year.


You know you want to eat that.

I saw this recipe online a while ago and immediately resolved to make it for my sister, who loves pumpkin things. They were a big hit with children and adults alike. My sister ate several before we saw Harry Potter and the Deathly Hallows (our Thanksgiving tradition is to go to the movies. It stems from before the days when I could cook). She also stole my camera and took some pictures of herself making funny faces. Here's one now!


Be warned, these take a while to make. But it's not difficult. You can do it!

Pumpkin Cinnamon Rolls - adapted from the Kitchen

For the dough:
1/4 cup water
1 scant tablespoon yeast (1 package)
1 cup milk
1/2 cup butter
1/2 cup sugar
1 15-ounce can pumpkin puree
1 1/2 teaspoons kosher salt
5 1/2 cups all-purpose flour

For the filling:
1/2 cup butter
1 cup packed brown sugar
2 teaspoons cinnamon
1/2 teaspoon ginger
1/2 teaspoon nutmeg

For the glaze:
4 ounces cream cheese, room temperature
1 cup powdered sugar - I used way less than this. Maybe half a cup. But I'm not sure.
1/4 cup (1/2 stick) unsalted butter, room temperature
1/2 teaspoon vanilla extract

Sprinkle the yeast over the water and let it sit a few minutes until the yeast is dissolved. My mom was super impressed that I was using yeast to make bread. Your mom will be impressed as well.

Meanwhile, warm the milk and butter in a small saucepan on the stove top until the butter is melted. Combine this with the sugar in a large heat-proof mixing bowl and stir until the sugar is completely dissolved.

Let the milk mixture cool until it is just warm to the touch - NOT HOT. Then stir in the yeast and the pumpkin. Add the salt and five cups of the flour all at once, stirring until all the flour has been absorbed. Squish it between your hands if you’re having trouble incorporating the last of the flour. The dough will be sticky, but should come together in a shaggy ball. If it's still more the consistency of cookie batter, work in an additional 1/2 cup of flower. Mine was fine, so I just went on.


Cover the dough and let it rise for 1-3 hours. It has to be in a warm place, or it won't rise. I put mine in the warming drawer of the oven. You can also turn on the oven to 150 degrees for a few minutes and then turn it off and put them in there. During this time, it should double in bulk. Here's mine!


At this point, you can punch the dough down and refrigerate it overnight or continue shaping the rolls. I put mine in the fridge so that I could wake up early and everyone could have freshly baked rolls. I'm nice that way.

Okay, now it's the next morning. I am so excited for Thanksgiving that I wake up at 6:40am without an alarm and get up right away. My family thinks I am crazy, but they appreciate how excited I am and go with it (once they wake up, that is). Here's the dough now!


To shape the rolls (either immediately or with the refrigerated dough), sprinkle your work surface with a little flour and dump the dough on top. Pat it down into a rough rectangle and then use a floured rolling pin to roll it into a rectangular shape about a half an inch thick, longer than it is wide. If the dough gets sticky, sprinkle a little more flour on the dough’s surface and on your hands.

Melt the butter in the microwave and stir in the brown sugar and the spices. I wouldn't melt it completely - just soften it so that it doesn't squirt everywhere when you roll it up. Spread this over the rectangle of dough, leaving an inch of bare dough at the top.


Starting at the edge closest to you, roll the dough into a cylinder and pinch it closed at the top.


Rub a tablespoon of soft butter into the bottom of two 9x13 baking dishes, two 9-inch cake pans, or a combination (I used many many pans). Using a bench cutter or a sharp knife, cut the cylinder into individual rolls 1 - 1 1/2 inches thick. Place them into your baking dishes so they have a little wiggle room on all sides to rise.


Cover them with a clean kitchen towel and let them rise until they fill the pan and look puffy, 30 minutes for already-warm dough and 1 hour for dough that’s been refrigerated. It's amazing to actually have clean kitchen towels. And an oven that works. And pretty lighting in the kitchen. Sometimes I think my brother had the right idea, living with my parents. But my house is okay too! I have DVR. That's something.

About 20 minutes before baking, begin heating the oven to 375°. When the rolls are ready, bake them for 20-25 minutes, until the tops are golden and starting to look toasted around the edges. Rotate the pans halfway through cooking.

While they are baking, prepare the glaze. Combine cream cheese, powdered sugar, butter, and vanilla in medium bowl. Using electric mixer, beat until smooth. Or, you know, just use a spoon and some upper arm muscles and do it by hand. That's what I did.


Let the baked rolls cool for about two minutes and then brush the glaze on top. Eat them immediately.


Don't they look professional? You should be really impressed now.

Leftovers will keep for several days and are best reheated for a minute in the microwave. These are incredibly good and you should make them for your family. Or for yourself. The pumpkin flavor is really subtle but adds some great dimension to a basic breakfast. The only problem is now my sister says I have to make them every Thanksgiving. Argh!

Monday, November 22, 2010

Sometimes life is just against you

This weekend I'd planned to do two things: volunteer for three days at the Arts for All Book Fair and attend Abby and Adam's Alternate Thanksgiving Party (where everyone brings a dish that their family wouldn't eat). Unfortunately, a nasty stomach virus wiped out all my plans entirely. Fail.

Sadly for me (but happily for Zack), I'd already made the dish I'd planned to bring to the party. He wasn't going to be able to attend because of work, so the silver lining of all this is that he got to eat the food I made. He seemed happy about that part at least (but sadder about me moaning in pain/falling asleep for 45 minute bouts all day).

Sweet Potato Sourdough Stuffing

4-5 pounds of sweet potatoes (I still have like 10 pounds left. My CSA went sweet potato crazy)
1 onion
3 cloves of garlic
half a bunch of sage
half a pound of bacon
olive oil
salt
pepper
2 eggs
1/4 cup milk or cream
2 cups chicken stock (or more if you want your stuffing super moist)

Peel and cube the sweet potatoes. Put on a baking sheet (covered with foil to make the clean up easier), cover with olive oil, and sprinkle on some salt and pepper to taste. Roast in the oven at 400 degrees for about 25 minutes, or until tender (my oven is all wonky, so monitor these closely - my times may not be right).


Fry up some bacon. If you like it crispy, make it crispy. If you like it less crispy, that's up to you. Drain it on some paper towels until you're ready for it.


Add some olive oil to the bacon drippings in the pan. Mmmm, bacon fat. Chop the onion, garlic and sage to the pan and saute until soft (about 5 minutes). Add a pinch of salt and pepper if you feel so inclined.


Tear up a loaf of sourdough bread. I love the tangy contrast that the sourdough gives to the sweet potatoes. You could take the crust off if you want, but I like it.


Combine everything in a baking dish. Beat the eggs and milk in a separate bowl and pour over the stuffing. Pour the chicken broth over as well. Bake for 25 minutes at 400 degrees or until the top is crispy but the middle is still kind of gooey. You don't want your stuffing to dry out.


I love any savory sweet potato dish. I often find sweet potatoes too sugary, but the onion and bacon really bring out some darker notes that are awesome. This is a great nontraditional stuffing (or dressing, if you want to get technical about it) that would be welcome on my Thanksgiving table anytime (but not my parents. They're anti-bacon).

Friday, November 19, 2010

In need of Thanksgiving recipes?


Here are a few of my favorites that I pulled from my past entries. I hope they help you plan your dinner!

Pre-meal nibbles:

Really good roasted red pepper dip - yummy and health concious.

Candied Pecans - Addictive. You could add them to a salad as well! Or on top of sweet potatoes. Or just eat them straight like my family does.

Pecan Goat Cheese Balls - a fancy twist on a classic nosh.

Parmesan Prociutto Stuffed Mushrooms - Everybody loves these. Except vegetarians.

Soup:

Acorn Squash Soup - I love starting the meal off with soup. It's so warm and yummy.

Turkey:

My only turkey recipe on this blog - ridiculously indulgent and amazing. It calls for truffle butter. Enough said.

Sides:

Chestnut Leek and Apple Dressing - a fun, slightly different dressing (or stuffing if you want to put it in the bird - but don't do that).

Zucchini Gratin - you can get local zucchini in parts of the world that aren't the Northeast right now. And nothing says Thanksgiving like drenching green vegetables in cheese and cream.

Quinoa with Sun Dried Tomatoes - Great for the gluten free and super healthy (like my dad).

Braised Cabbage - Did you know that some parts of the country serve sauerkraut at Thanksgiving? This is a little more universally pleasing.

Sauteed Swiss Chard - Quick, simple, healthy. And it tastes good!

Simple Turkey Giblet Stock - great for making gravy!

Quick Glazed Root Vegetables - very appropriate for fall.

Pie:

Alli's Peanut Butter Pie - If you like peanut butter dessert, this is a great way to go.

Mixed Berry Pie - A classic.

Sweet Potato Pie - Incredibly good, and a nice change if you're sick of pumpkin.

I'll post some more this week as well, I hope! Get ready to eat!

Monday, November 15, 2010

It's almost time for my sister's favorite holiday

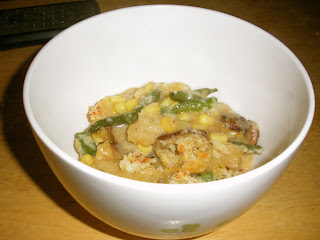
That's right, folks. It's almost Thanksgiving and like every other food blogger in the nation, I am rolling out some recipes that you can make on the big day. Here's a great new side dish that is vegetarian friendly (unless the vegetarians are cheese/taste averse - like my family).

Creamed Haricot Vert and Corn Casserole - from Food and Wine magazine

Note: I halved this recipe and it was pretty big. So if you don't have a lot of folks coming over, maybe scale back.

1 1/2 pounds haricots verts, cut into 1 1/2-inch lengths
1 stick plus 2 tablespoons unsalted butter
1 1/2 pounds oyster mushrooms, thickly sliced - also, I may have used different mushrooms. It was still good.
Salt and freshly ground pepper
1 large sweet onion, very finely chopped
4 garlic cloves, minced
Two 10-ounce packages frozen corn, thawed (4 cups)
1/2 cup all-purpose flour
1 quart whole milk - I used skim milk. That's all I have.
6 ounces Gruyère cheese, shredded (1 1/2 cups)
Freshly grated nutmeg
1/2 cup panko (Japanese bread crumbs) - I used regular fresh bread crumbs
1/2 cup freshly grated Parmigiano-Reggiano cheese

Preheat the oven to 350°. In a pot of boiling salted water, blanch the haricots verts until crisp-tender, about 2 minutes. Drain and cool under running water. Pat dry.

In a very large, deep skillet, melt 4 tablespoons of the butter. Add the mushrooms, season with salt and pepper and cook over moderately high heat, stirring frequently, until lightly browned, 6 to 7 minutes. Add the onion and garlic and cook over low heat, stirring occasionally, until softened, about 5 minutes. Add the corn and cook, stirring occasionally, until the mixture is dry and the corn is just beginning to brown, about 5 minutes. Add the haricots verts and keep warm.


Mmmm, vegetables.

In a large saucepan, melt the remaining 6 tablespoons of butter. Add the flour and whisk over moderate heat until fragrant and lightly browned, about 4 minutes.


Whisk in the milk until smooth and bring to a boil. Reduce the heat to moderately low and simmer, whisking constantly, until very thick, about 5 minutes. Remove from the heat. Stir in the Gruyère and season with salt, pepper and nutmeg.


Pour the sauce over the vegetables and stir well. Pour the mixture into a 4-quart baking dish (I cheated and left everything in my dutch oven. I didn't want to wash another dish). In a small bowl, combine the panko with the Parmigiano (or just sprinkle some bread crumbs and then cheese. Again with the dishes!) and sprinkle over the vegetables.


Set the baking dish on a rimmed baking sheet and bake in the center of the oven for 30 minutes, until bubbling. Turn on the broiler and broil the casserole for 3 to 4 minutes, until the top is golden and crisp. Let the casserole rest for 10 minutes before serving.


I ate it all on its own. It was a nice full dish, creamy and savory. I would gladly eat a bowlful.


And I did. Zack liked it a lot as well. I got a text in the middle of the day saying "The mushroom/corn/green beans thing is delicious." Compliments without prompting = good food.

Thursday, November 11, 2010

I wish I had some of these right now

I love making aggressively Jewish food. I didn't really grow up eating it all that much. Our family staples pretty much included pesto pasta, corn tortillas with refried beans and cheese, Chinese food and salad. Now that I'm in control of my own food production, I like to make things that I can pretend my grandmother used to make.

I made these for the first time last Christmas to give away as gifts. I liked them a lot. I'm a sucker for a good cream cheese dough.

Rugelach!

8 ounces cream cheese, at room temperature
1/2-pound unsalted butter, at room temperature
1/4 cup granulated sugar
1/4 teaspoon kosher salt
1 teaspoon pure vanilla extract
2 cups all-purpose flour, plus more for rolling
Filling of your choice - I like jam or melted chocolate
1 egg beaten with 1 tablespoon milk, for egg wash

Add the cheese and butter to the bowl of an electric mixer fitted with the paddle attachment and beat until light. Add 1/4 cup granulated sugar, the salt, and vanilla. With the mixer on low speed, add the flour and mix until just combined.


If you don't have a stand mixer, you can still beat this together by hand. But it won't be as easy. And you won't have an awesome stand mixer.

Dump the dough out onto a well-floured board and roll it into a ball. Cut the ball in quarters, wrap each piece in plastic, and refrigerate for 1 hour.

After it's been chilled, roll it out on a flat surface with some flour. Spread the filling of your choice over it. This is the jam that my sister made in VT.


Cut the whole circle into 12 triangles, like pie wedges.


Starting with the wide edge, roll up each wedge. Arrange the cookies, points tucked under, on a baking sheet(s) lined with parchment paper (or a Sil Pat - don't use tin foil. They will stick like nobody's business). Chill for 30 minutes.


Brush each cookies with egg wash and sprinkle with a little sugar (you can mix in cinnamon as well here). Bake at 350 degrees for 15-20 minutes.


Yum. I love how flaky the dough is. The cookies (like all cookies) are amazing when they are warm and fresh out of the oven. Maybe I will make you some for the holiday season.

Monday, November 1, 2010

Back to work, guys!
No more dressing up in whimsical costumes and eating a lot of candy (or drinking a lot of booze) - it's Monday morning and you've got to get back to work. I hope you all had a fun and safe Halloween weekend. I spent mine sitting around in my pajamas, cooking and watching Sports Night on DVD. This is what happens when I work at four different places all week long. It makes me tired.

One of the best things about fall vegetables is that they are instant comfort food. Mostly they revolve around things like potatoes and squash and they delight in being warm carb-y goodness. This recipe was given to me by my friend Alex many years ago, back in the days from when she knew how to cook and I didn't at all. She made this for me once and I loved it so much, I demanded the recipe and found it again recently, scribbled on the back of an old IRS form in the midst of my bookcase that collapsed (luckily, not on me).

Alex's Butternut Squash Pasta

1 small butternut squash, peeled and cut into a large dice (or one package from Trader Joe's)
8 shallots, peeled and halved length wise (I sliced mine)
1 or 2 Tbs brown sugar
2 Tbs olive oil
1 tsp salt
1/2 tsp pepper
1 Tbs fresh sage, torn
Parmesan cheese

1 package pasta of your choice

This is super simple, even I could do it before I could cook.

Combine all the ingredients except cheese and pasta in a baking dish (the kind with raised sides - not a sheet).


Bake in the oven for 30 minutes at 475 degrees. While this happens, cook your pasta. Take the squash out of the oven and combine with your cooked pasta.


Top with cheese and serve.


This is so good. If you're into the whole salty-sweet thing, this is the dish for you. It's warm and comforting and super flavorful. Thanks to Alex for teaching me how to make it! It is really delicious.

Friday, October 29, 2010

Texas Food

Meredith and I had the chance for about three meals in Texas, so she showed me some iconic Texas cuisine: Mexican food, BBQ and "nuevo Texan food." First up: Mexican at Joe T's.


I may have disparaged it in the past, but I am here to eat my words. Tex-Mex is AMAZING. Who knew that hard taco shells could be delicious? I sure didn't.


Yes, that is rice and beans with two enchiladas and two tacos. And a margarita. I was really hungry. Meredith had chicken fajitas.


I'm sure they were good too.

Many hours later, we tried real Texas BBQ at Cousins.


I had brisket - very different from how I make it (haha).


Check out the pink ring around the edge. That means it's good. Meredith had ribs.


I've never been a ribs person, but I may be reforming. I love eating with my hands.

We had black eyed peas, fried okra and green beans on the side (not to mention the BBQ sauce). I don't really like BBQ sauce (at least not from a bottle), but this was good. Nice and tangy without too much smoky flavor.


Also, they have giant goblets of beer.


We then moved on to brunch at Tillmans.


I had skirt steak with a poached egg over smoky gouda grits.


It was absolute heaven. It's like all my favorite things together - runny eggs, juicy steak and cheese. Amazing. Who could ask for anything more?

All in all - Texas food is just super great. Especially when you have a wonderful guide like Meredith. Thanks for the great trip!